Create Music for Free

Sunday, April 30, 2006

Recording Drum and Guitar Tracks

Recording Drum and Guitar Tracks
This lesson will build on previous lessons. We will use the drum track we created, 8bars.wav in Audacity. While playing this track back through the sound card (or headphones) we will record a guitar part over the old track.

  • Start Audacity.

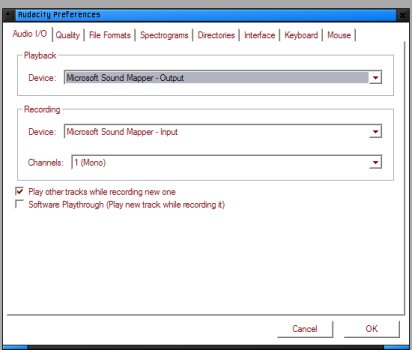
  • Setup Audacity for Playback and Recording:

  • Click on File -> Preferences and click on the checkbox for “Play other tracks while recording new one”. Click on OK.


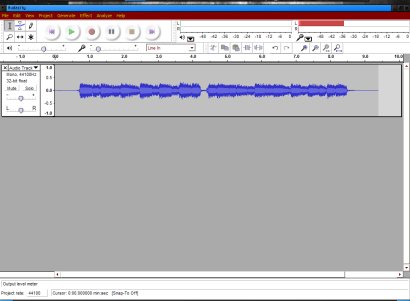
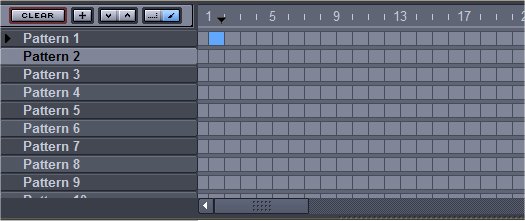
  • Now we will import our Drum Track, 8bars.wav. Click on “Project,” and then “Import Audio”. Navigate to the folder you put 8bars.wav in and, once you’ve found the file, click on it and click OK.

  • Your screen should now look like this:


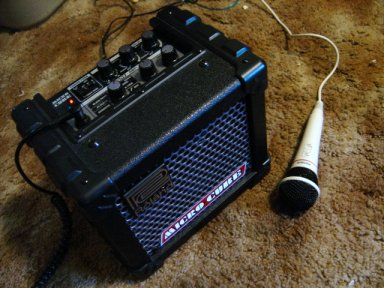
  • Get your guitar ready, make sure everything’s plugged in. You might get a friend to help out if you want.

  • When you are ready, Click on the “Record” button. You will hear the drum track being played through your speakers. Use headphones if this interferes with your microphone.

  • After the first measure of drums, lay down a simple 12-bar blues guitar track. (There should be some tab available on the internet).

  • You should have enough time for about 2 times through a 12-bar arrangement.

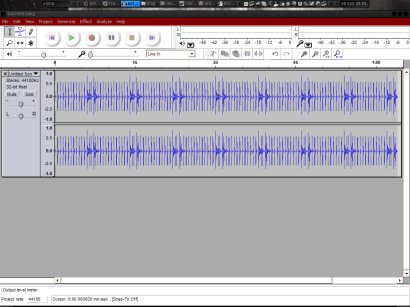
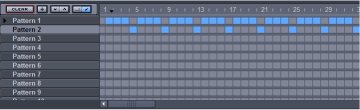
  • Click stop when you are finished.

  • Your screen should now look like this:


  • Now you’re ready to hear the song coming together! Press “Play” on the controls (The round button with the green arrow) to hear your composition.

  • Save your composition by clicking on “File -> Save Project As” and naming it “8barsong”.
Congratulations, you’ve done your first multitrack recording!

Recording A Sound in Audacity

Recording A Sound in Audacity
For this entry, we will be using the program Audacity. See this post for information on how to download and setup Audacity and the last post for hooking up your gear.

  • Start Audacity by double clicking on the icon on your desktop or where it is installed to.

  • On the top toolbar, there is a drop down menu set on “Microphone”. You may click on the dropdown to change it to “Line in” if you are using a line in device instead.

  • Once you have selected your input source, click on the “record” button. This is a large round button on the top of the screen with a red circle in it.

  • A picture of your sound should show up on the screen like this:


  • If it doesn’t, make sure you have the right recording device selected. To the left of the input selection is a level indicator. Sliding it to the right will increase the recording level. Try increasing this also if you have no sound.
If you have a sound, great! You’re ready for the next lesson! Otherwise, keep trying or check the Audicity Online Help by clicking on “Help -> Online Help” in the program.

Setting Up Your Hardware for Recording


Setting Up your Computer for Recording
For the next round of tutorials, we will be recording live instruments (This makes an assumption that you play some instrument or have a friend that does, if not, go learn an instrument or make some musician friends!)

Before you can record, you’ll need Audacity (See the first couple posts, it’s free) and some equipment for recording. You’ll need some sort of recording device, this could be:
  • Microphone (must have a small stereo plug at the end to plug into your sound card, if not, adapters are available at Radio Shack like this one. You also may need some sort of phantom power. There are also USB microphones now available that are very convenient for home recording. For regular microphones, plug them into the mic input on your sound card (usually the pink port)

  • Direct Input Device (This could be a direct input box, a modelling pedal or an amplifier with a line-level recording output). I will be using a Roland MicroCube for this example, which is a guitar amp with several amp models. You will need a cable to connect the output from the device to the line input of your sound card. (Usually marked as the blue port)

  • Sound Card – You probably already have one of these built into your computer. Quality varies, and at some point you may consider purchasing a specialized recording sound card, such as ones from EMU or M-Audio.

In the next lesson, we will test out recording in Audacity.

Using Hydrogen (V: Putting Together the Song)

Hydrogen (Part V: Putting together the Song)
Now that we have the basic pattern and a fill, we can put these together in order as a song. Once again the basic drum structure in a song is:

Bar – Bar – Bar – Fill

  • Look at the Song Editor. Notice that there is a blue block in the row marked “Pattern 1”. This indicates that the song is to play 1 instance of “Pattern 1”.


  • Click on the next two blocks next to it and then on the 4th block for “Pattern 2” as shown:


  • On the Transport Controls, click on the “Mode” button to change playback from “Pattern” to “Song” (See this post if you don’t know where it is)

  • Replicate the same 4 bars 7 more times so it looks like this:


  • Congratulations! We’re done with the drum section of our song, now let’s save our work and export it.

  • Click on “Project” on the top toolbar.

  • Click on “Save As”.

  • Find a folder on your harddrive to save your work as. You will need to create a folder outside of the program, otherwise, just save it on C: D: etc. for now.

  • For filename, call it 8bars.h2song
Now that your work is saved, you can always load it up later and modify the beat all you want. Continuing on to make our short blues song, however, let’s export the file to a WAV so we can continue working on it in Audacity (a sound editing program, see first posts and next lesson).

  • Click on “Project”

  • Click on “Export song”

  • Click on “Browse” and find a folder you would like to work in, or just use C: for the time being.

  • Under “File Name:” type “8bars.wav”

  • Click on “Save”

  • Click on “Export” then once it is done, click on “Close”
Congratulations! You’ve completed the drum part of the song. Next, we’ll go onto recording the guitar and bass bits in Audacity.

Using Hydrogen (IV: Making a "Fill")

Hydrogen (Part IV: Making a “Fill”)
Now that we have made a short bar for our song, we need to make a fill.

Typically, a song structure will go like this.

Bar – Bar – Bar – Fill

The fill mixes up the beat a little with some crashes or a changeup to liven up the music. Listen to some of your favorite music sometime and listen for it.

We’ll make a fill in Hydrogen for this lesson.

Making the Fill Pattern
  • Click on Pattern 2 in the Song Editor (see this post if you don’t remember where the Song editor is)

  • A blank pattern should show up in the pattern editor window.

  • Like we did in the last lesson, put in the following beats:

  • “Kick” at “1” and “2.5’ (2.5 is the space between 2 and 3).

  • “Snare Rock” at “2” “3.5” and “4”.

  • Crash at “1’ and “3.5”.

  • Press play on the transport control to hear the new pattern.

  • Here is what is should look like:

Using Hydrogen (III: Making a Drum Pattern)

Using Hydrogen (III: Making a Drum Pattern)
In this next installment, we will be making a simple drum pattern in Hydrogen. If you don’t have Hydrogen on your computer yet, or aren’t sure what it is, please look back at previous posts to get going.

For purposes of the tutorial, I will be making a simple 12-bar blues song. It will be simple enough to understand, yet the lessons will be applicable to any style of music you would like to make.

Open Hydrogen from your Desktop (See Getting Started if needed).
  • In the main program window, look at the pattern editor area. Look at the column under “1”. This is the first beat of the measure.

  • Click on the row and column for “Kick” and “1”. This will put a dot in the area like shown. On the first beat, the kick drum sample will be played.

  • Add another beat: this time match the row and column for “Snare Rock” and “2”.
  • Add another beat: this time match the row and column for “Snare Rock” and “4”.
  • Add another beat: this time match the row and column for “Kick” and “3”. Your pattern should now look like this:

  • Press play on the transport control, you should now hear a simple beat. This is the first measure in our song! Good job!

Using Hydrogen (II: Program Layout)

Using Hydrogen (II: Hydrogen Layout Reference)
Before we get started editing patterns, here’s a quick reference guide you can refer to for terminology used in the pattern lesson. Take a quick look at these and refer back to them as we move along.
Using Hydrogen (II: Hydrogen Layout Reference)
Before we get started editing patterns, here’s a quick reference guide you can refer to for terminology used in the pattern lesson. Take a quick look at these and refer back to them as we move along.

Program Layout
Top of screen (Transport Controls)
  • At the top-left of the screen is the transport. From here you can control playback of the current pattern or song being worked on using the buttons that resemble those of a CD / MP3 player.

  • Right of the transport is the mode button will switch between controlling the playback of the current pattern being edited (The middle of the screen) or the entire song (Top of screen below transport)

  • Right of the mode button are the tempo controls. Using the + or – arrows will speed up or slow down the song being worked on. 120bpm is a fairly standard pop / rock tempo. 90bpm is slower, ballad sounding. 140bpm and up moves into faster, metal or electronic music territory.

  • Right of the tempo are MIDI controls. MIDI stands for “Musical Instrument Digital Interface”. This is useful if you would like to control an external drum machine. This will not be covered here.

  • Right of MIDI controls are Mixer and Instrument Rack buttons. Using these will allow you to control how many editing windows you want to see on the screen. Click to turn them on or off.
Song Editor (Below transport)
From here, patterns (usually a 4-bar beat) are arranged into songs. The patterns are named down the list at Pattern 1, Pattern 2, etc. and may be renamed or otherwise manipulated by right clicking on the pattern.

Clicking on the squares next to a pattern will indicate if that pattern is being played or not. The song plays from left to right through the patterns.

Pattern Editor
The pattern editor lists the various drum sample names (Crash, Kick, Stick, etc.). To the right of these are some beat numbers, 1, 2, 3, 4 with the spots inbetween them. This is the pattern editor. A drum beat is created here by clickinging to arrange when samples play. A few bars of a drumbeat are created and then arranged into a song in the Song Pattern Editor.

Clicking below 1, 2, 3, 4 on the row that corresponds to the sample name will cause that to play back on that beat.

Below the pattern editor grid is the resolution control. Using the size and resolution buttons will allow you to control how closely you would like to edit the drum pattern. If you would like to have sixteen beats in a single measure, you can control that here.

Instrument Rack (Lower Right)
This control panel, when switched on, allows the user to edit parameters on the instrument samples, such as attack, decay, sustain and release which control the sound and shape of a sample. Sound Library allows the user to load different “kits” or collections of drum samples.

Mixer Window
Going to the mixer window by either clicking on it in the toolbar or using alt-tab to switch from the current window will display it.

Here, the samples are labeled next to the sliders. A slider may be controlled by clicking and dragging the mouse up and down on the slider. Doing so controls the volume of the sample selected.

Other switches and buttons give further control over the sample being edited.

Using Hydrogen (I: Getting Started)

Using Hydrogen (I: Getting Started)

Back in the 60’s and 70’s, electronic instruments began to appear alongside the more traditional acoustic guitars and pianos. The synthesizer captivated a generation with strange bleeps and warbles.

Growing up alongside them, more quietly, but still surely was the drum machine. This mechnical rhythmic device could play accompaniment for another guitarist when a drummer wasn’t available, and it didn’t do drugs!

The first were very mechanical and robotic sounding. As the years have progressed, however, it has become increasingly difficult to distinguish between the real drummer and the drum machine, unless that it is the goal.

Hydrogen, is an open-source program designed to open up the possibilities of a drum machine to the computer musician. This highly impressive piece of freely available software can load sampled drum recordings and allow the user to create patterns, and in turn creates songs from these patterns.

Let’s get started:
  • Double click on the Hydrogen icon on your desktop.

  • Read the features list and then click OK to get started.

  • Two windows open up: The main program window, and the mixer window. You may click between these or use alt-tab to change between them.

  • Go to the Main window.

  • In the middle of the screen, there is a list of drum instrument samples, such as “Crash Jazz,” “Ride Rock,” “Kick,” “Stick,” etc. Click on one of these sample names and you will hear what it sounds like.

Next lesson will help us be familiarized with the layout of the program.

Sunday, April 09, 2006

Installing Programs

Installation Instructions for Microsoft Windows
Welcome to “Create Music for Free,” a music creation blog. Please see previous entries to get caught up to where we are!

In case you need some help getting these cool programs on your computer, here’s a quick guide. Other Operating Systems will follow a similar process but I will not cover that here for simplicity sake.

Audacity
  1. Download the Audacity installer EXE for Windows from: HERE

  2. A window will probably pop-up asking if you want to run or save the file. Click on save file and then OK.

  3. Save the file to your desktop by clicking on the desktop icon and hitting SAVE.

  4. Minimise your browser windows and double click on the the audacity file saved to your desktop.

  5. Click on Next.

  6. Read the software agreement, if you want, and click “I agree” then next.

  7. Either use the default directory or type in where you want to install the program.

  8. Keep clicking on “Next” through the install process and then “Install”.

  9. Launch Audacity when you are finished.

Hydrogen
  1. Download the Hydrogen installer EXE for Windows from: HERE

  2. A window will probably pop-up asking if you want to run or save the file. Click on save file then OK.

  3. Save the file to your desktop by clicking on the desktop icon and hitting SAVE.

  4. Minimise your browser windows and double click on the hydrogen file saved to your desktop.

  5. Click through the Nexts.

  6. Either use the default directory or type in where you want to install the program.

  7. Keep clicking on “Next” through the install process and then “Install”.

  8. Launch Hydrogen when you are finished.

Make Music on your Computer!

Introduction
Recording your own music tracks can be easy and fun, and surprisingly, cheap! All you need is a computer less than five years old, some time and patience and the desire to make music! (Playing an instrument of some sort can also be helpful)

In this tutorial, you will learn the steps involved in producing an entire song using entirely free software! This software is free, as in open-source. That is, this software is available without charge, for anyone to use, for any purpose, commerical or personal.

To get started, you will need to download and install the following applications onto your computer. They should be available for Windows / Mac OSX / Linux.

  • Audacity - Free, fully-functional multi-track audio editor

  • Hydrogen – Advanced drum machine with professional yet simple intuitive pattern-based drum programming

For purposes of simplicity, the instructions will be covered for use on a Microsoft Windows machine. However, while installation instructions and slight details may differ, the knowledge and operation of the programs is essentially the same for all platforms and you may still enjoy this tutorial.